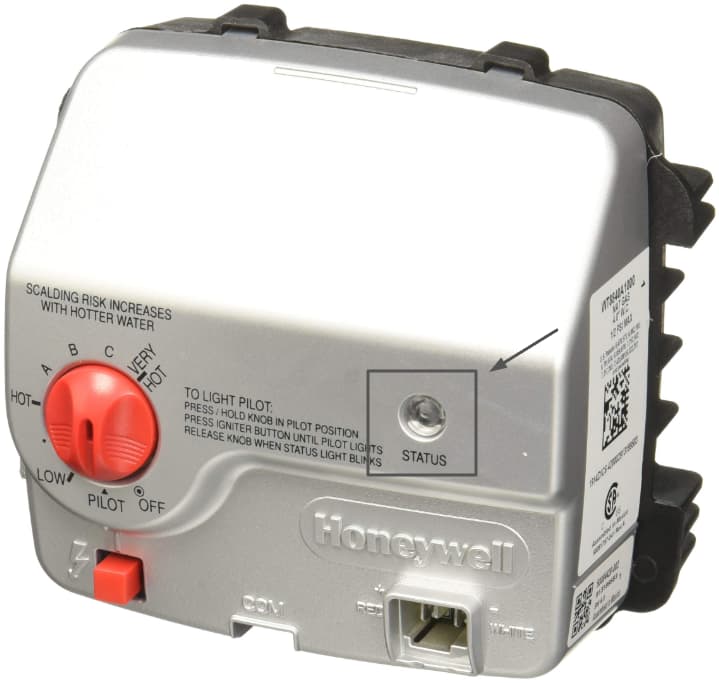
You may one day notice the status light on your Honeywell hot water heater intermittently blinking. This light provides important diagnostic information to help troubleshoot problems with your unit.
Honeywell Hot Water Heater Status Light Blinking – Fix

The status light may blink between 1-8 times in a repeating cycle every 3 seconds. Each blinking pattern indicates a specific issue that needs to be addressed:
- 1 Flash – Normal operation
- 2 Flashes – Low thermopile voltage
- 3 Flashes – Faulty internal component
- 4 Flashes – High-temperature limit reached
- 5 Flashes – Failed water temperature sensor
- 6 Flashes – Water leakage detected
- 7 Flashes – Electronics failure
- 8 Flashes – Control module not powered
Understanding why your Honeywell water heater status light is blinking is the first step to diagnosing and repairing the underlying problem.
Honeywell Water Heater Status Light Flashing – Meaning
The status light on your Honeywell water heater provides diagnostics on the operation of internal components.
Here is an overview of what each blinking code signals:
-
1 Flash Every 3 Seconds – This indicates normal operation of the pilot light and main burner components. No action is required.
-
2 Flashes – This indicates that either the main gas valve is not turned on or there is low voltage output from the thermopile. The thermopile generates electricity to power the gas valve. Low voltage indicates a thermopile issue.
-
3 Flashes – This signals an issue with internal components that cause operation faults. Potential culprits are:
- Clogged condensate drainage system
- Blocked exhaust vent piping
- Faulty draft pressure switch
-
4 Flashes – The water heater has reached its high-temperature limit shutoff. This is typically caused by a faulty water temperature sensor, valve, or improper temperature set point.
-
5 Flashes – Indicates a failure with the water temperature sensor. This sensor monitors outbound water temperature. Failure can be caused by overheating, resistance differences, or other defects.
-
6 Flashes – This signals that an accessory module has detected water leakage from inside the tank system. It may also indicate issues with the main burner.
-
7 Flashes – This points to an electronics failure within the control module or gas valve.
-
8 Flashes – Indicates the control module is not properly seeing voltage from the thermopile. This points to a problem with the flammable vapor sensor (FVS) or gas control operation.
So in summary, blinking light codes allow you to hone in on the failed component causing operational problems.
Fix Honeywell Hot Water Heater Status Light Blinking:
With an understanding of the meaning behind blinking status light codes, you can now focus on solutions.
Each issue indicated by the blinking light will have its own troubleshooting and repair methodology. Let’s explore each scenario:
1. Status Light Blinks 1 Time
- As outlined previously, a single blink every 3 seconds indicates the normal operational function of the pilot light assembly and main burner.
- No troubleshooting or repair action needs to be taken in this event. Allow the water heater to continue standard operation.
2. Status Light Blinks 2 Times
- Two blinks point to problems with thermopile voltage or the main gas valve operation:
- First, inspect the thermopile and connections for defects. Check that wire leads are tight and the component is securely attached with no physical damage.
- Using a multimeter, check the voltage output from the thermopile while the pilot light is on. Voltage should measure between 650-850 mV when hot.
- If the voltage is below this, the thermopile must be replaced. Verify voltage after installing the new unit.
- Check the function of the main gas valve. Verify gas flow and that power is present when the system calls for heat. If issues are found, repair or replace the failed component.
How To Check The Thermopile?
Checking voltage output from the thermopile when hot is key to diagnosing problems:
- Gain access to the underside of the water heater to locate the thermopile sensor near the main burner.
- Using a digital multimeter switched to the DC voltage setting, attach leads to the two wire connectors off the gas valve that connects to the thermopile sensor.
- Light pilot light assembly. Hold the igniter button to generate heat on the thermopile sensor. Watch voltage levels increase on the multimeter over 3-5 minutes.
- Voltage must measure between 650 and 850 mV when the thermopile is hot. Replace part if the voltage does not reach the proper level.
3. Status Light Blinks 3 Times
- As outlined previously, 3 blinks indicate problems with internal components:
- Inspect the condensate drainage system underneath the water heater. Clean out any debris or blockages preventing proper water flow.
- Remove and inspect exhaust vent piping for blockage points. Clear any dirt or debris.
- The draft pressure switch monitors venting performance. This is most likely the culprit component. Have a technician inspect for faults and replace if defective.
- Verify normal status light operation after making repairs.
4. Status Light Blinks 4 Times
-
4 blinks signal the water heater has activated its high-temperature limit switch and powered down the heating system.
-
Faults that can lead to this are:
- Defective or misreading water temperature sensor
- The improper high limit set point is too low
- Issues with gas valve or heating control operation
-
Replace the failed water temperature sensor on the back of the unit
-
Adjust high temp limit set point to 120-140°F
-
Thoroughly inspect heating components like igniters, gas valves, and burner assemblies for additional faults
-
To restart from temp limit lockout:
- Rotate the temperature dial to “pilot” for 1 minute
- Set the dial to “very hot” for 10 seconds
- Set the dial to “hot” for 10 seconds
- Return the dial to the normal temperature setting
5. Status Light Blinks 5 Times
- The water temperature sensor monitors outbound water temp. Sensor failures will cause a 5 blink status light.
- Faults leading to failure are typically corrosion, scale buildup, separation of components, electrical shorts, and excessive heat exposure.
To thoroughly test the sensor:
- Gain access to the back of the water heater.
- Locate the sensor connected to the control module.
- With the multimeter switched to the ohms setting, place leads on the center hole and outside ring terminal.
- Note resistance measurement and compare to sensor reference chart values based on water temp.
- Significant deviations point to defects.
Replace sensor module if diagnosed as defective
How To Test Temperature Sensor?
When a faulty water temperature sensor is suspected based on the blinking status light warning, it must be checked with a multimeter:
- Carefully detach sensor wiring from the control board mounted on the back of the tank.
- Place leads of a multimeter, set to ohms reading, on the middle hole connector and outer ring connector of the disk-shaped sensor module.
- Check resistance values against a sensor resistance chart. Reference chart to compare expected values vs measured values, based on current water temperature from reference thermometer.
- Deviations between values point to defects requiring sensor replacement. Consult the service manual for the next steps on the proper installation of the new sensor.
6. The Status Light Blinks 6 Times
- 6 blinks indicate that an accessory module has detected water leaking from the inner tank.
- Thoroughly inspect fittings, pipe connections, tank seams, and joints for evidence of water leakage. Repair any leaks found.
- If leaking is detected from cracks in the inner tank, replacement of the entire hot water system is likely required.
- The other possibility is a fault with the main burner. Inspect the burner for obstruction points and clear any debris.
7. Status Light Blinks 7 Times
7 blinks signal an electronics malfunction with the control module or gas valve:
Verify all wiring connections leading to and from components for a secure fit.
- Power connection
- Gas valve hookup
- Water temp sensor
If the wiring checks out, the gas valve itself has likely failed. Follow the guidelines for replacement:
- Turn off the gas line and water lines in/out of the heater
- Drain tank completely
- Disconnect all wiring to the gas valve
- Unscrew the gas valve and disconnect the mounting hardware
- Install new gas valve tightly
- Reconnect wiring
- Check for leaks
- Refill tank
- Attempt startup
Gas Control Valve Replacement
If blinking light codes and troubleshooting point to a faulty gas valve, replacement must be carried out per the steps below:
- Rotate the control knob on the water heater to the “OFF” position.
- Shut off the gas supply at the exterior line or meter.
- Turn off the water supply lines connected to the water heater.
- Attach a garden hose to drain the spigot of the tank and route it to the drain basin.
- Open the drain valve and allow all water to drain from the tank.
- Disconnect wire leads and gas supply line from a defective valve.
- Unscrew the mounting hardware and remove the gas valve.
- Install new gas valve using thread sealant on connections.
- Reconnect the gas supply line and wiring harness.
- Check for gas leaks at the valve using a spray solution or meter.
8. Status Light Blinks 8 Times
- 8 blinks generally signal an issue with the electrical flow to the control module. This causes the gas valve not to function.
- Specific issues that can lead to this warning are:
- Loose wiring connections at the valve
- Shorts in wiring between components
- Flammable Vapor Sensor (FVS) resistance out of range
- Defects with the gas valve board itself
- Carefully inspect the wiring harness for secure fit and no damaged leads or insulation
- Consult service diagram to check wiring colors and pinouts between components
- Using a multimeter, check the resistance of the FVS sensor. Consult chart for acceptable ohm range relative to temperature.
- If no wiring defects are found, the gas valve likely needs to be replaced
How To Reset Honeywell Hot Water Heater?
If basic troubleshooting steps do not resolve the blinking status light warning, a system reset may be required:
- Locate the temperature dial on the front control panel
- Switch the dial to the pilot light position
- Press in dial while simultaneously holding the igniter button to power on the pilot
- Let the pilot run for 2 minutes for the thermopile to heat up
- After 2 minutes, turn the dial to the “Hot” setting for ~10 seconds
- Next, rotate back to “Very Hot” for another 10 seconds
- Finally, return the dial back to the normal temperature set point
- This process recycles power to the gas valve, module, and sensors to allow a reset of the system
- Attempt to relight pilot light assembly
- If the status error continues, further repairs are likely needed
FAQs: Honeywell Water Heater Blinking Light
- Why does my Honeywell hot water heater blink 3 times?
A: 3 blinks indicate an issue with internal components like a clogged condensate drain, blocked exhaust vent, or faulty draft pressure switch.
- What should I check if my status light blinks 4 times?
A: 4 times indicates the high limit temperature has tripped. Check the water temperature sensor, high limit switch set point, gas valve, and other heating components.
- My status light is blinking 2 times – what does this mean?
A: 2 blinks signal low voltage from the thermopile or a problem with the main gas valve not opening properly. Check both components.
- How can I get my Honeywell water heater out of lockout mode when the status light stops blinking?
A: To exit limit lockout mode, rotate the temp dial to pilot for 1 minute, to very hot for 10 seconds, to hot for 10 seconds, and then back to normal temp setting.
- Why does my Honeywell water heater keep going out?
A: Frequent shut-offs can be caused by a faulty thermocouple, bad gas valve, loose wiring, or repeated high temp limit tripping.
- The status light blinks 7 times – what should I test?
A: 7 blinks indicate an electronics error. Check all wiring connections and the gas valve itself. Replace if defective.
- What causes the status light to blink 6 times?
A: 6 blinks signal a leak detection alarm or issue with the main burner. Thoroughly inspect for leaks and clear any gas burner obstructions.
- My pilot light keeps going out – why?
A: Reasons for repeated pilot light failure are contamination/clogs in the orifice, defective igniter, faulty thermopile, gas valve defect, or combustion air intake blockage.
- How often should the status light on a Honeywell water heater blink?
A: During normal operation the light should blink only once every 3 seconds. More than 1 blink points to an error code.
- Does the LED status light indicate different problems than the LED display codes?
A: Yes – Diagnostic LED light blinks signify sensor & electrical issues while LED display codes show specific operational fault messages.
Advanced Guides for Home Items:
- Xfinity Remote Flashes Green Then Red
- KitchenAid Dishwasher Clean Light Blinking
- Pura Diffuser Blinking Red And Green Lights
- Google Fiber Jack Blinking Red
- Frida Humidifier Blinking Blue
- Sonicare Toothbrush Light Blinking Rapidly
Conclusion
Diagnosing why your Honeywell water heater status light is blinking gives you insights into what internal component is malfunctioning.
- Each blinking pattern signals a specific issue – from low thermopile voltage to control module defects
- Follow the troubleshooting tips outlined for each fault code
- Test critical parts like the thermopile sensor and water temperature probe
- Replace defective modules and sensors
- Conduct a control system reset after repairs
Understanding status light codes allows you to get your Honeywell water heater back up and running fast!


